If you’re a replacement window company expanding into daylighting, skylights in low-slope roofs demand a different mindset than steep-slope installs. The pitch is shallow, drainage is slower, and water wants to linger. That single fact reshapes almost every choice you’ll make, from the skylight type you recommend to the way you build and flash the curb.
Why Low-Slope Is Its Own Category
On low-slope roofs, water management comes first. Because water sheds more slowly, you need design details that actively help it leave the area around the unit. Taller curbs, domed or slightly sloped glazing, and membrane tie-ins that tolerate thermal movement are not luxuries here; they’re the line between a long, trouble-free life and callbacks.
Think about wind and debris, too. Wide, open roof planes collect leaves and see more uplift, so how the unit is secured and shaped matters as much as the glass itself.
The Best Skylight Types For Low-Slope Roofs
When homeowners ask for the best skylights for low-slope roofs, guide them toward curb-mounted systems first. A curb-mounted unit sits on a site-built or factory curb that stands proud of the finished roof surface.
That extra height helps keep standing water away from seams and gives roofers a clean, continuous surface to turn the membrane up and over. It also simplifies future reroofing because the curb can stay in place while the membrane and counterflashing get renewed.
Domed units are workhorses in this category. The gentle arch encourages water and debris to move off the lens instead of pooling on top. Acrylic is common for budget-conscious projects; polycarbonate earns the nod where impact resistance is a priority.
For rooms where aesthetics matter more, living spaces, kitchens, or any area where a modern look is important, curb-mounted flat glass is the premium choice. The key is to build a slight slope into the curb top so water doesn’t pool against the frame.
Tubular daylighting devices are another smart option for hallways, baths, and closets. They make a small roof penetration, the integral dome sheds water, and the reflective tube can weave around ductwork and framing that would complicate a rectangular shaft.
Sizing, Placement, And Daylight Quality
Natural light works best when the aperture matches the space and orientation. As a simple starting point, aim for roughly five to ten percent of the floor area you want to light, and taper toward the low end in bedrooms or where glare control is important.
North orientations deliver soft, even light throughout the day; east cues morning energy; west can be punchy in the afternoon and may need shading.
On framed roofs, align openings between joists or trusses and plan your headers before you cut. With deck-over-joist systems, confirm the structural plan with a licensed contractor so you’re not improving after the fact.
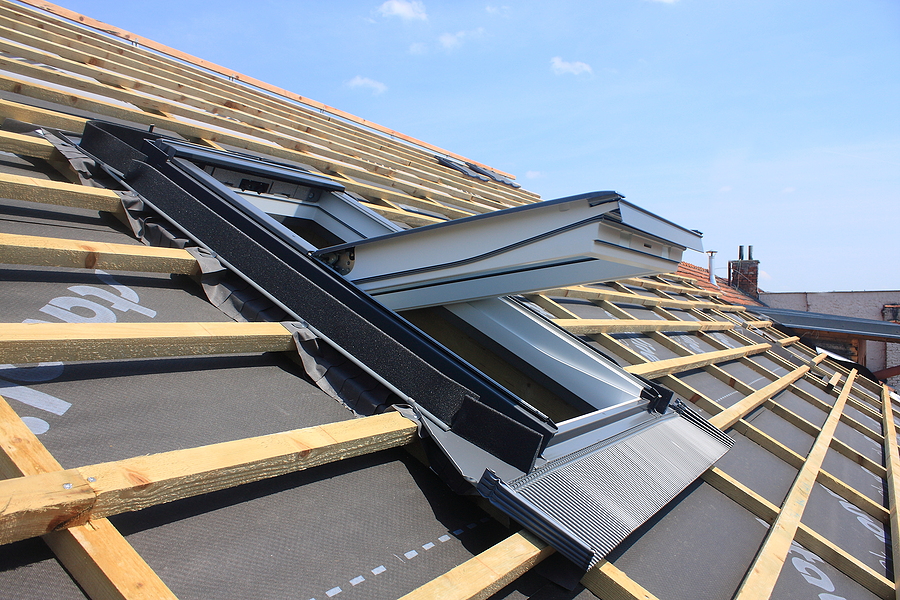
Curbs And Flashing: Where Projects Win Or Lose
Curbs are the make-or-break detail on low-slope installs. Height matters. In many climates, a six-inch curb is the minimum; in snowy or windy regions, eight to twelve inches is safer. Material choice is simple: exterior-grade plywood or dimensional lumber, well fastened and dead square.
Add a slight slope, about a quarter inch per foot, toward the downslope side so the top doesn’t behave like a bathtub rim.
Waterproofing is a sequence, not a single product. Wrap the curb with a self-adhered membrane for continuity, turn the roof membrane up the curb at least eight inches, and protect that turn-up with factory cladding or metal counterflashing that sheds cleanly.
Avoid fastening through horizontal membrane surfaces in areas where ponding could occur, and use sealants that play nicely with the roof system, manufacturer-approved chemistry only.
Glazing And Energy Performance
Glass packages follow the same logic you use for windows: low U-factors, controlled solar heat gain, and safer interior layers. Tempered-over-tempered with Low-E and argon qualifies as a solid baseline.
For high-value interiors, laminated glass on the room side adds safety and sound attenuation while improving UV filtering. Warm-edge spacers and thermally broken frames help keep condensation at bay.
For domed units, double or triple domes create insulating air spaces, and many include inner surfaces designed to control dripping at the perimeter. In heating-dominant climates, target a U-factor around 0.40 or better and an SHGC that preserves winter gain; in cooling-dominant zones, rein in SHGC to manage summer loads. None of this replaces good ventilation; always pair bath and kitchen skylights with real exhaust.
Fixed Versus Venting
Fixed skylights are the simplest to flash and the tightest against the weather on low slopes. They’re usually the safest default. Venting units add real comfort and moisture control, especially in kitchens and baths, but the gasketing and hardware need to be up to the task. On windward exposures or where storms arrive fast, specify rain sensors and caution homeowners about leaving venting units open. When in doubt, lean fixed on low-slope and get your airflow from dedicated fans.
Roof System Compatibility
Every roof system wants a slightly different dance. TPO and PVC favor heat-welded turns up the curb and pre-made accessories. EPDM needs a fully adhered turn-up, a termination bar, and the right lap sealant. Modified bitumen and built-up roofs get their plies up the curb and benefit from a crisp metal counterflashing. Reflective coatings are not a substitute for proper flashing; they’re an overcoat, not the raincoat.
Finishing The Interior
The daylight you deliver depends as much on the shaft as the skylight. Build the light well straight and smooth, air-seal it before you insulate, and paint the interior with a high-reflectance finish for a brighter, more even throw.
Where glare or privacy is a concern, add an integrated blind or a clean aftermarket shade. Low-E glass and laminated interlayers block most UV, but it’s still smart to warn clients about fading on delicate textiles directly beneath any strong light source.
A Field-Ready Installation Flow
Walk the attic or ceiling cavity first and confirm structure, utilities, and clearances. Lay out the opening, cut cleanly, and frame headers to restore any compromised joists or trusses. Build a curb that’s plumb, square, and slightly sloped. Air-seal the interior side before insulation so warm, moist air doesn’t sneak into the shaft.
Turn the roof membrane up the curb per the manufacturer’s spec, set the skylight to the fastening pattern provided, and complete the counter flashing for cladding. Before you close the interior, perform a controlled hose test with a low, steady flow to verify drainage and seam integrity. Then insulate, vapor-seal, drywall, and finish.
Avoid The Classic Errors
Most problems start small and predictable: curbs that are too low, curb tops that are perfectly flat, sealants that react with the roof membrane, interior air seals that were never installed, and venting units deployed on windward faces without rain sensors. Each is easy to prevent if you slow down at design and follow the roof manufacturer’s details in the field.
Maintenance And Homeowner Education
Set expectations early. Advise a simple annual inspection to check cladding, fasteners, and the roof membrane around the curb. Cleaning should be mild and non-abrasive—especially on acrylic domes.
Remind owners to keep roof drains and gutters clear to reduce ponding, and to manage indoor humidity in winter so condensation doesn’t form in the shaft. A little coaching now prevents “mystery leaks” that are often just moisture from inside the house.
Warranty And Code Notes
Coordinate brand and details with the roofer so the skylight and flashing approach won’t void a membrane warranty. Overhead glass must meet safety glazing requirements; laminated interiors are an elegant way to comply while improving acoustics. If a client asks about smoke vents or egress, clarify that residential skylights are typically not designed for those code functions unless specified differently.
Sales Guidance For Window Teams
Bundle daylighting with comfort and efficiency upgrades. Offer clear good-better-best tiers: a durable domed polycarbonate unit for utility areas, a curb-mounted Low-E glass unit for living spaces, and a laminated, solar-control package with integrated blinds and automation at the top. Use before/after visualizers to make the light impact tangible. Be transparent about lead times on custom sizes and factory cladding; curbs and glass aren’t always off-the-shelf.
For skylights in low-slope roofs, curb-mounted units plus disciplined flashing win the day. Elevate the curb, slope the top, respect the roof membrane’s rules, and treat the interior air seal like you would on a high-performance window. Do those things and your installs will be bright, dry, and dependable, exactly what homeowners expect when they trust a window pro with the sky.
Ready To Upgrade Your Windows & Skylights?
Get expert guidance, fast quotes, and leak-free installs, start here. Request Your Free Consultation.